

cyphen156
C# 실습 1 .NET 8 Winforms 앱 만들기 본문
이 글에서는 .NET 8과 Winforms를 사용하여 계산기와 로그인창, 숫자 맞추는 게임을 만든다.
1. 기본 개념익히기
맨처음 WindowsForms 앱 템플릿으로 프로젝트를 생성하면 다음과 같은 화면 구성을 만들 수 있다.

완벽하게 일치하는 것은 아니지만 어느정도 안드로이드 앱 만들때의 경험을 되살려서 여기에 써먹을 수 있을것 같다. Form1.cs[디자인]에서는 안드로이드 XML파일과 같이 화면 구성을 담당하는 파일이다. 도구상자에서 UI구성에 필요한 요소들을 디자인 창에 드래그 & 드롭으로 추가할 수 있다.
Form1.cs파일은 디자인 파일과 연동되어 실제 화면 로직에서 여러 이벤트들이 발생했을 때 처리되는 로직들을 담당할 클래스파일이다. 추가된 요소들을 속성 창을 통해 제어하거나 직접 코드 수정을 통해 바꿀 수 있다.
Program.cs파일은 프로그램이 실행되었을 때 가장 먼저 진입하게되는 main파일로, 안드로이드의 Mainactivity.java(kt)파일에 해당한다.
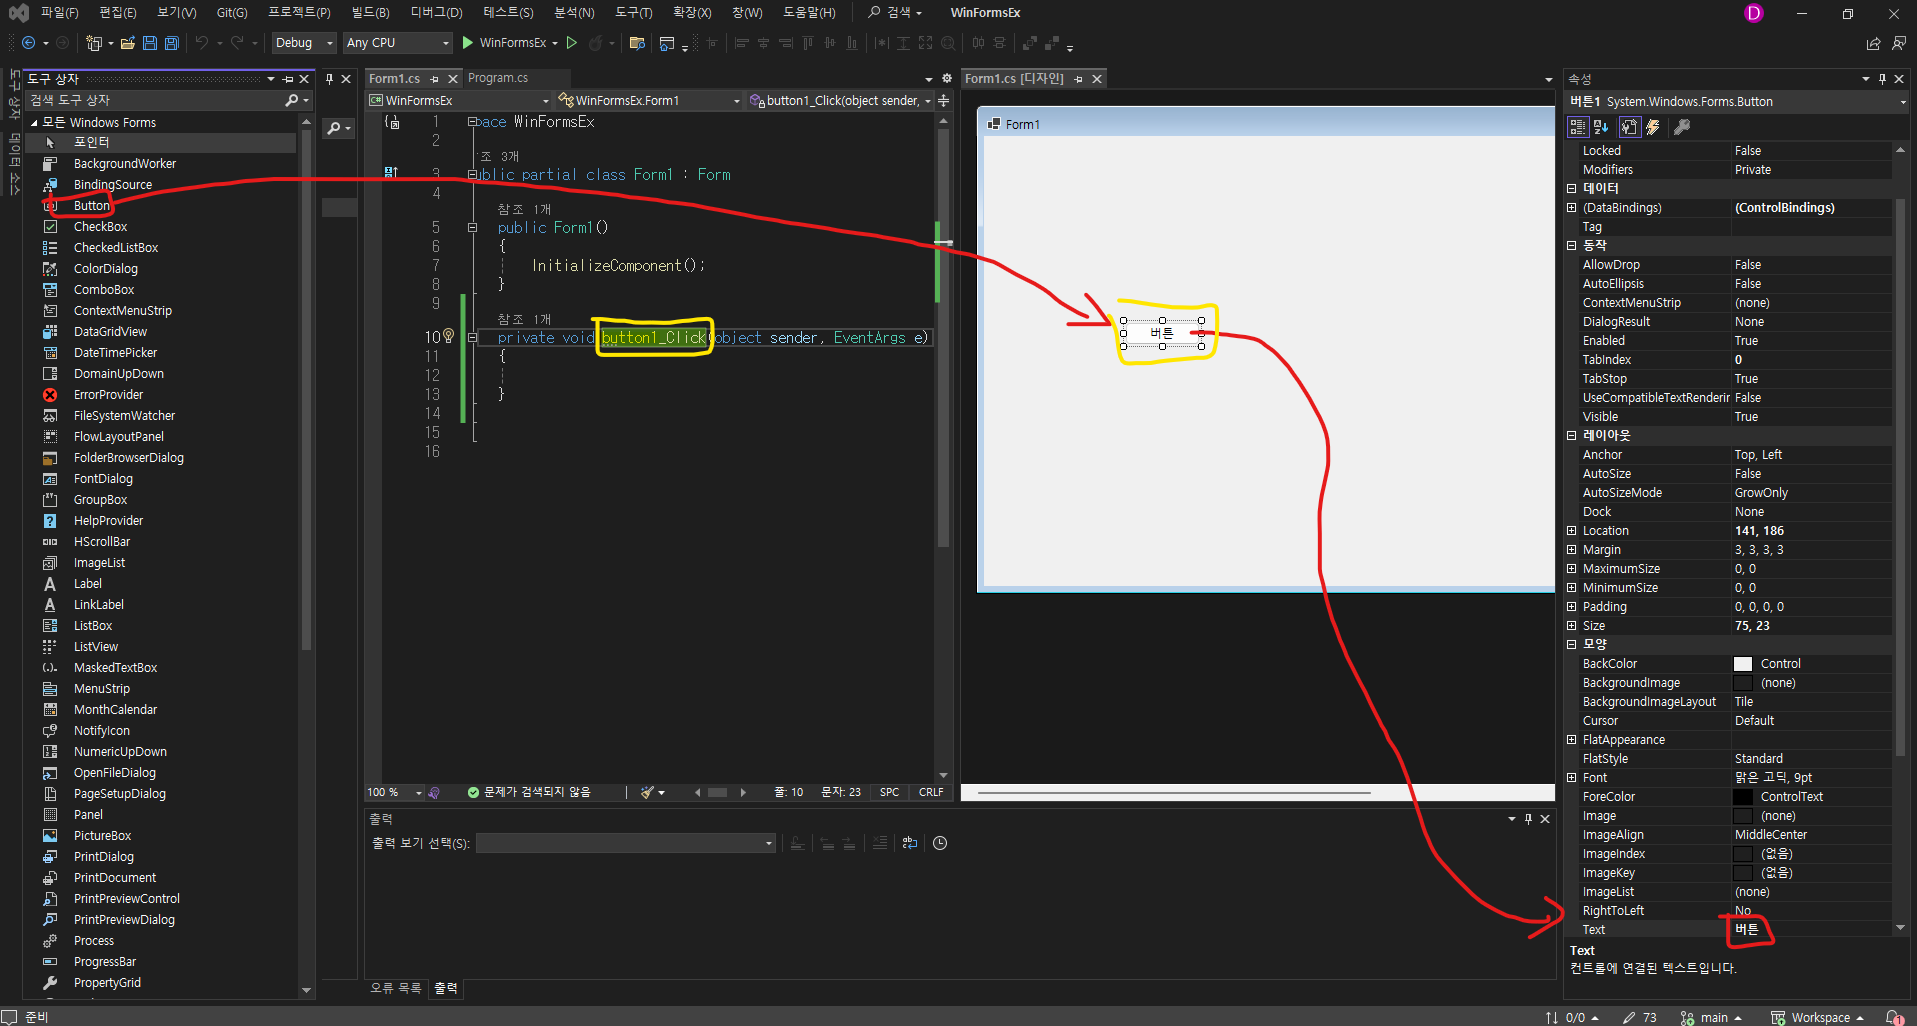
버튼을 디자인에 놓았을 때 From1.cs파일 안에 private void button1_click이라는 함수가 생겼다. 그리고 Form1.Designer.cs파일에는 private Button 버튼1이라는 버튼 인스턴스가 생겻다.
이 인스턴스는 Form1.Designer.cs파일 안에 존재하는 InitializeComponent 메서드가 호출될때 버튼에 대한 정보를 담고 있는 인스턴스로, 여러가지 옵션들을 가지고 있다. 여기서 직접 코드를 수정해도 되고, 속성 창을 통해 수정해도 된다.
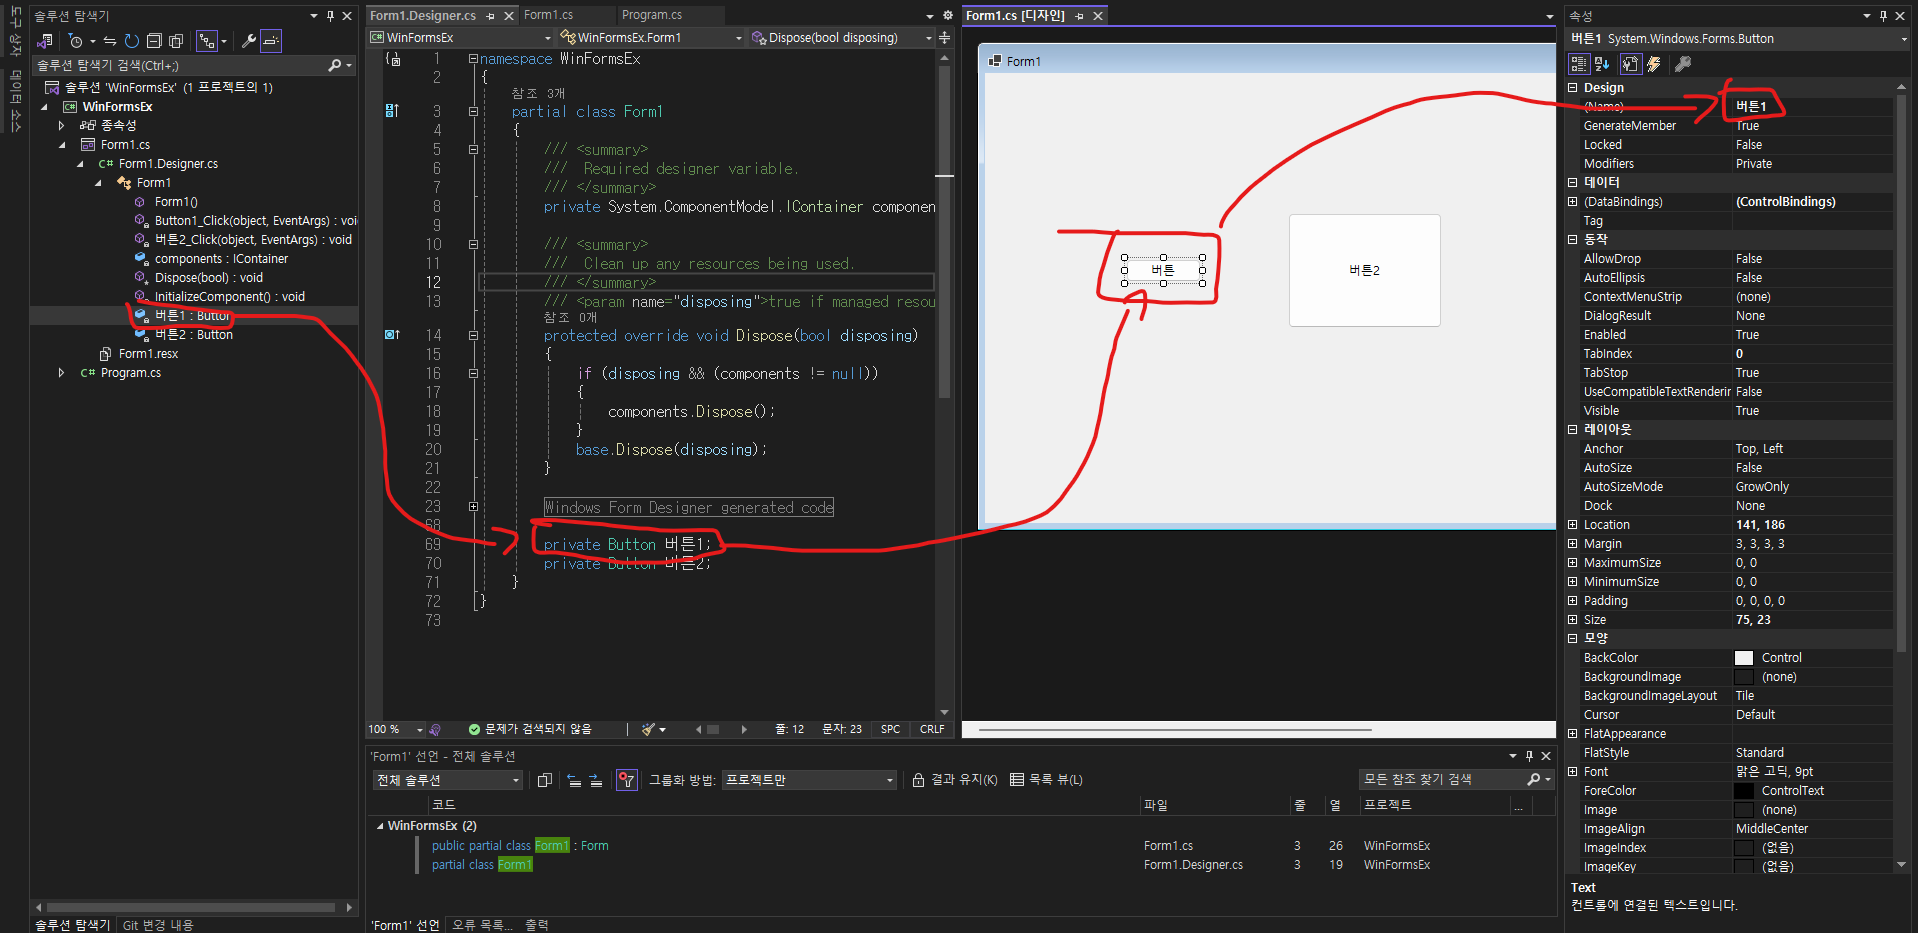

이제 버튼을 한개 더 넣고서 클릭 이벤트에서 버튼 텍스트를 바꾸는 로직을 적용시켜보자

이래놓고서 F5를 눌러 디버깅하면 다음과 같이 동작하는 프로그램이 완성된다.
2. 로그인 창 구성하기
맨 처음 해야할 일은 화면 레이아웃부터 구성하는것이다.
코드가 길어서 접어놓겠다.
namespace WinFormsEx
{
partial class Form1
{
/// <summary>
/// Required designer variable.
/// </summary>
private System.ComponentModel.IContainer components = null;
/// <summary>
/// Clean up any resources being used.
/// </summary>
/// <param name="disposing">true if managed resources should be disposed; otherwise, false.</param>
protected override void Dispose(bool disposing)
{
if (disposing && (components != null))
{
components.Dispose();
}
base.Dispose(disposing);
}
#region Windows Form Designer generated code
/// <summary>
/// Required method for Designer support - do not modify
/// the contents of this method with the code editor.
/// </summary>
private void InitializeComponent()
{
label1 = new Label();
textBox1 = new TextBox();
textBox2 = new TextBox();
button1 = new Button();
SuspendLayout();
//
// label1
//
label1.AutoSize = true;
label1.Location = new Point(240, 158);
label1.Name = "Login";
label1.Size = new Size(100, 23);
label1.TextAlign = ContentAlignment.MiddleCenter;
label1.TabIndex = 0;
label1.Text = "로그인 창";
label1.Click += label1_Click;
//
// textBox1
//
textBox1.Location = new Point(222, 176);
textBox1.Name = "ID";
textBox1.Text = "ID";
textBox1.Size = new Size(100, 23);
textBox1.TabIndex = 1;
textBox2.TextChanged += this.textBox1_TextChanged;
//
// textBox2
//
textBox2.Location = new Point(222, 205);
textBox2.Name = "Password";
textBox2.Text = "Password";
textBox2.Size = new Size(100, 23);
textBox2.TabIndex = 2;
textBox2.TextChanged += this.textBox2_TextChanged;
//
// button1
//
button1.Location = new Point(222, 234);
button1.Name = "Log-In";
button1.Size = new Size(100, 30);
button1.TabIndex = 3;
button1.Text = "로그인 하기";
button1.UseVisualStyleBackColor = true;
button1.Click += this.button1_Click;
//
// Form1
//
AutoScaleDimensions = new SizeF(7F, 15F);
AutoScaleMode = AutoScaleMode.Font;
ClientSize = new Size(800, 450);
Controls.Add(button1);
Controls.Add(textBox2);
Controls.Add(textBox1);
Controls.Add(label1);
Name = "Form1";
Text = "Form1";
ResumeLayout(false);
PerformLayout();
}
#endregion
private Label label1;
private TextBox textBox1;
private TextBox textBox2;
private Button button1;
}
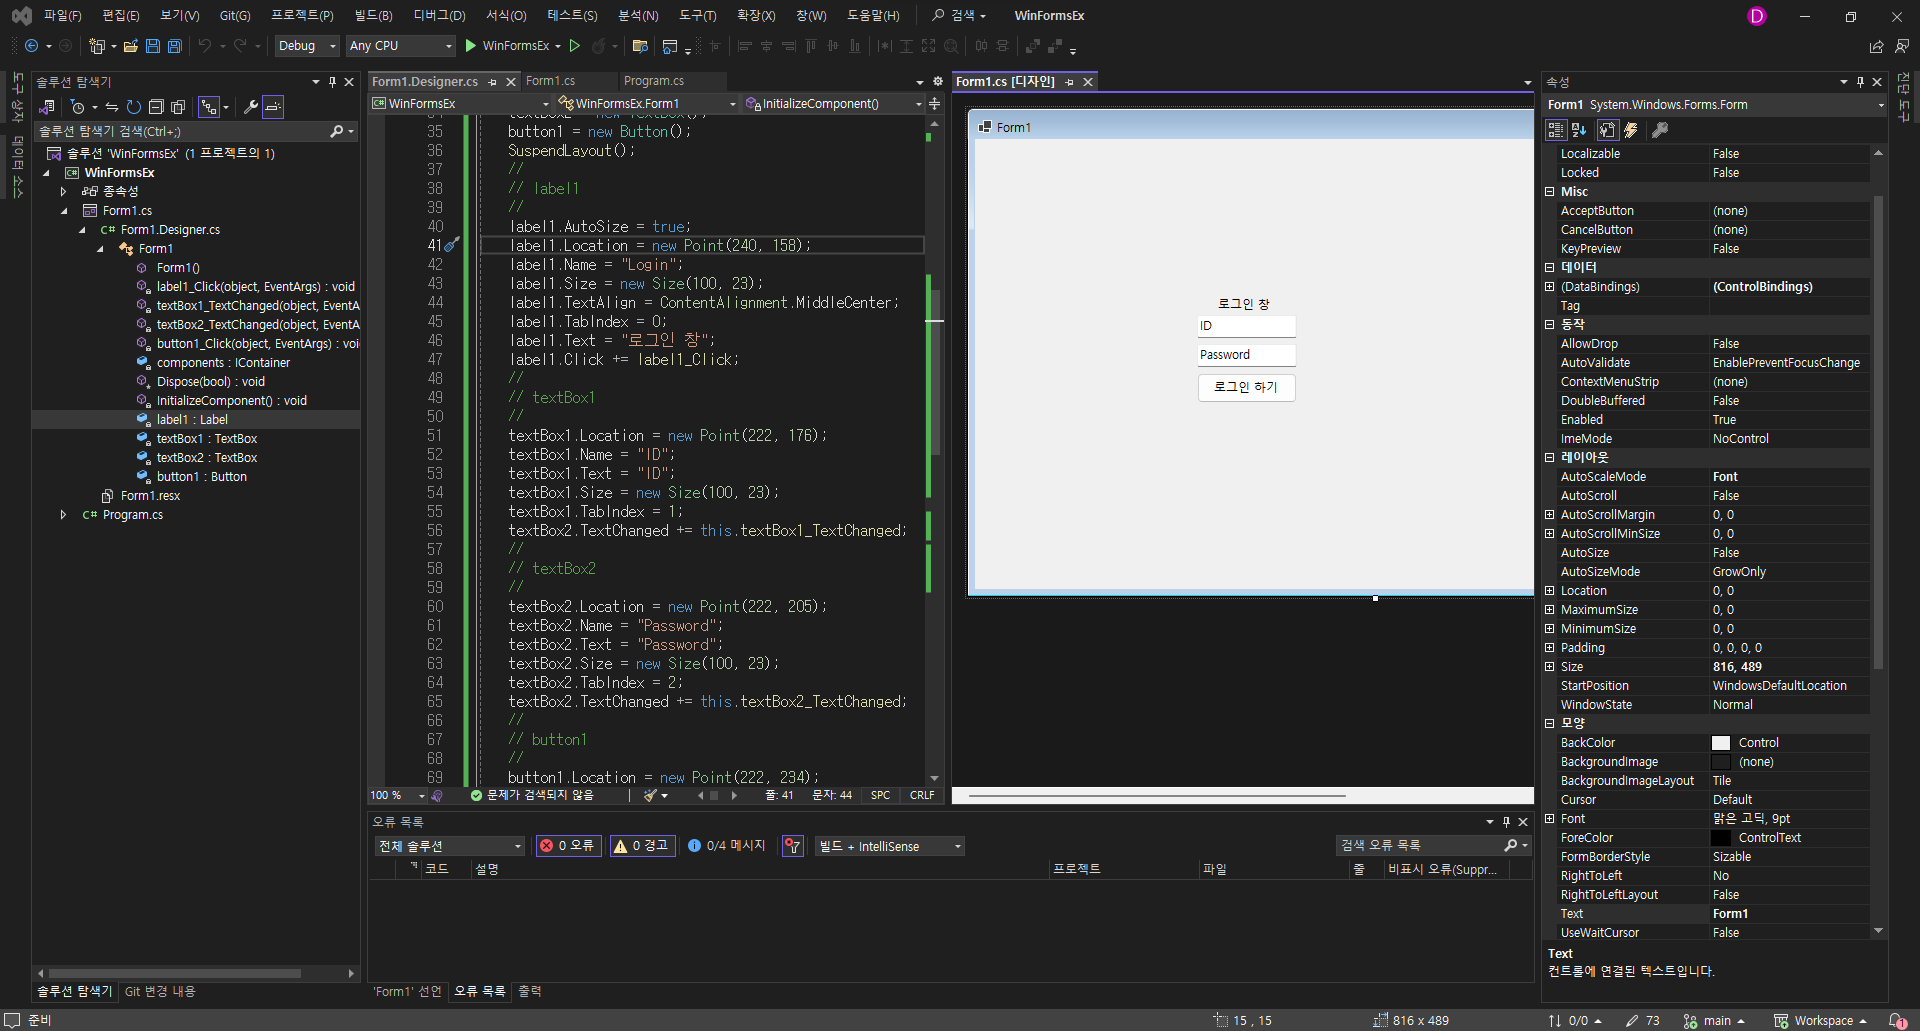
}위 코드를 Form1.Designer.cs파일에 적용하면 다음과 같은 화면 레이아웃이 구성된다.
그리고 나서 이벤트 연결을 위해 Form1.cs파일에 다음과 같은 메서드들을 추가한다.
이 메서드들 중 button1_Click이벤트만 사용할 것이다.

private void button1_Click(object sender, EventArgs e)
{
    string UId = textBox1.Text;
    string UPw = textBox2.Text;
    if (UId.Equals("Admin"))
    {
        if (UPw.Equals("12345678"))
        {
            MessageBox.Show("로그인 성공", "로그인");
        }
        else
        {
            MessageBox.Show("비밀번호가 다릅니다.", "WrongPassword");
        }
    }
    else
    {
        MessageBox.Show("아이디가 다릅니다.", "invalid ID");
    }
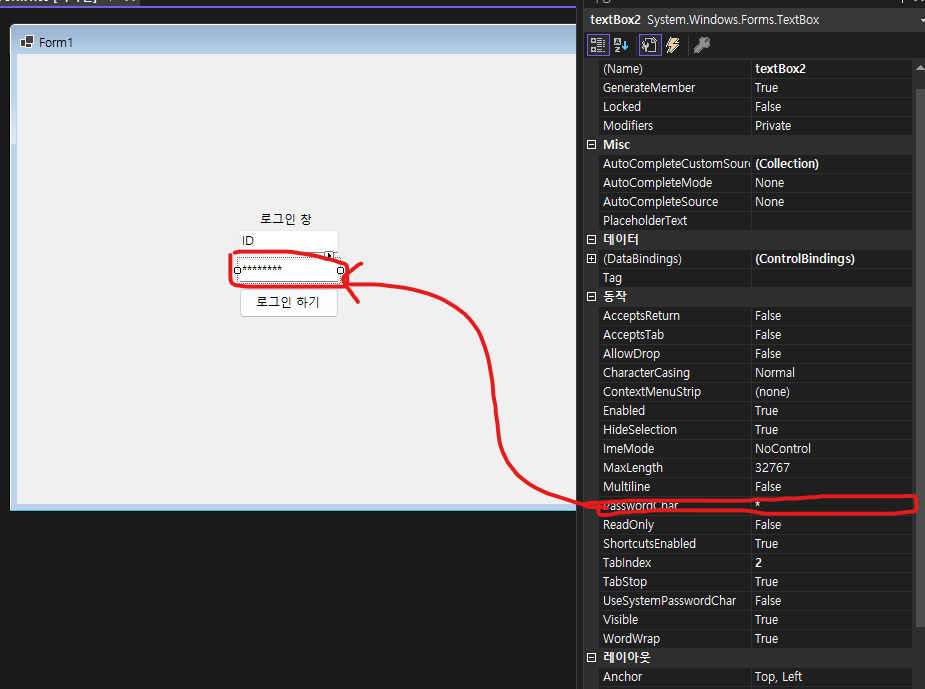
}추가적으로 비밀번호 가리기 옵션은 textBox2의 속성에 Passwordchar에 원하는 문자를 넣으면 해당 문자로 대체되어 표기된다.
3. 숫자 맞히기 게임으로 이동하기
로그인에 성공했으면 숫자맞히기 게임으로 화면을 전환시킬것이다. 기존에 사용하는 창을 그대로 놔둔 채 가시/비가시를 이용해 바꾸려고 한다.
우선 로그인 성공시 로그인화면을 비활성화 하자.
2에서 만들었던 button1_Click메서드의 로그인 성공 로직에 다음 코드를 삽입하자. 사실 그냥 보이지 않도록 처리한것이기때문에 로그인 기능은 해당 화면에 아직 살아있다.
label1.Visible = false;
textBox1.Visible = false;
textBox2.Visible = false;
button1.Visible = false;
그리고 UI에 label 1개, textBox1개, button 2개를 추가로 생성하되, 초기 visible의 값을 false로 준다.
추가된 메서드는 다음과 같다.
namespace WinFormsEx
{
    partial class Form1
    {
        /// <summary>
        ///  Required designer variable.
        /// </summary>
        private System.ComponentModel.IContainer components = null;

        /// <summary>
        ///  Clean up any resources being used.
        /// </summary>
        /// <param name="disposing">true if managed resources should be disposed; otherwise, false.</param>
        protected override void Dispose(bool disposing)
        {
            if (disposing && (components != null))
            {
                components.Dispose();
            }
            base.Dispose(disposing);
        }

        #region Windows Form Designer generated code

        /// <summary>
        ///  Required method for Designer support - do not modify
        ///  the contents of this method with the code editor.
        /// </summary>
        private void InitializeComponent()
        {
            label1 = new Label();
            textBox1 = new TextBox();
            textBox2 = new TextBox();
            button1 = new Button();
            label2 = new Label();
            textBox3 = new TextBox();
            button2 = new Button();
            button3 = new Button();
            SuspendLayout();
            //
            // label1
            //
            label1.AutoSize = true;
            label1.Location = new Point(240, 158);
            label1.Name = "Login";
            label1.Size = new Size(100, 23);
            label1.TextAlign = ContentAlignment.MiddleCenter;
            label1.TabIndex = 0;
            label1.Text = "로그인 창";
            label1.Click += label1_Click;
            //
            // textBox1
            //
            textBox1.Location = new Point(222, 176);
            textBox1.Name = "ID";
            textBox1.Text = "ID";
            textBox1.Size = new Size(100, 23);
            textBox1.TabIndex = 1;
            textBox2.TextChanged += this.textBox1_TextChanged;
            //
            // textBox2
            //
            textBox2.Location = new Point(222, 205);
            textBox2.Name = "Password";
            textBox2.Text = "Password";
            textBox2.Size = new Size(100, 23);
            textBox2.TabIndex = 2;
            textBox2.TextChanged += this.textBox2_TextChanged;
            //
            // button1
            //
            button1.Location = new Point(222, 234);
            button1.Name = "Log-In";
            button1.Size = new Size(100, 30);
            button1.TabIndex = 3;
            button1.Text = "로그인 하기";
            button1.UseVisualStyleBackColor = true;
            button1.Click += this.button1_Click;
            //
            // label2
            //
            label2.AutoSize = false;
            label2.Location = new Point(220, 202);
            label2.Name = "GameLabel";
            label2.Size = new Size(150, 30);
            label2.TabIndex = 4;
            label2.Text = "게임을 시작합니다.";
            label2.Visible = false;
            //
            // textBox3
            //
            textBox3.Location = new Point(156, 224);
            textBox3.Name = "TextInput";
            textBox3.Size = new Size(100, 23);
            textBox3.TabIndex = 5;
            textBox3.Visible = false;
            //
            // button2
            //
            button2.Location = new Point(287, 223);
            button2.Name = "InputText";
            button2.Size = new Size(75, 23);
            button2.TabIndex = 6;
            button2.Text = "입력";
            button2.UseVisualStyleBackColor = true;
            button2.Visible = false;
            button2.Click += Button2_Click;
            //
            // button3
            //
            button3.Location = new Point(240, 253);
            button3.Name = "StartGame";
            button3.Size = new Size(75, 23);
            button3.TabIndex = 7;
            button3.Text = "게임 시작";
            button3.UseVisualStyleBackColor = true;
            button3.Visible = false;
            button3.Click += Button3_Click;
            //
            // Form1
            //
            AutoScaleDimensions = new SizeF(7F, 15F);
            AutoScaleMode = AutoScaleMode.Font;
            ClientSize = new Size(800, 450);
            Controls.Add(button3);
            Controls.Add(button2);
            Controls.Add(textBox3);
            Controls.Add(label2);
            Controls.Add(button1);
            Controls.Add(textBox2);
            Controls.Add(textBox1);
            Controls.Add(label1);
            Name = "Form1";
            Text = "Form1";
            ResumeLayout(false);
            PerformLayout();
        }

        #endregion

        private Label label1;
        private TextBox textBox1;
        private TextBox textBox2;
        private Button button1;
        private Label label2;
        private TextBox textBox3;
        private Button button2;
        private Button button3;
    }
}
아직 프로그램을 실행하지 않은 상태에서는 다음과 같이 화면이 구성된다.

로그인 성공시 비활성화 코드 하단에 다음과 같은 코드를 입력해 새 폼을 보여준다.
label2.Visible = true;
textBox3.Visible = true;
button2.Visible = true;
button3.Visible = true;
Form1 클래스 내부에 다음과 같은 변수들을 선언하고, button3에 이벤트를 연결하여 게임 시작버튼 이벤트를 생성한다.
private int findNumber = 0;
private int chance = 0;
private void Button3_Click(object sender, EventArgs e)
{
var rand = new Random();
findNumber = rand.Next(1, 21);
chance = 10;
label2.Text = "맞힐 숫자를 입력하세요.";
}그리고 입력 버튼에 이벤트를 연결한다.
private void Button2_Click(object sender, EventArgs e)
{
    int inputNumber = Int32.Parse(textBox3.Text);
    if ( inputNumber == findNumber)
    {
        label2.Text = "승리했습니다.!!";
    }
    else
    {
        chance--;
        label2.Text = "기회는" + chance + "번 남았습니다.";
    }

    if (chance <= 0)
    {
        label2.Text = "실패하였습니다.";
    }
}
C# Winform 숫자 맞히기 게임 - YouTube
4. 계산기로 화면 전환하기.
이번엔 기존 화면을 그대로 사용하여 눈속임 하는것이 아니라 실제로 화면을 이동시킬 것이다.
3. 에서의 정답을 맞췄을 때 계산기 폼 인스턴스를 생성하고, 화면을 보여준다.
if ( inputNumber == findNumber)
{
    label2.Text = "승리했습니다.!!\n계산기로 이동합니다.";
    // 계산기 폼으로 이동
    Calculator calculatorForm = new Calculator();
    calculatorForm.Show();
}
이러면 연결준비는 끝났다. 이제 계산기 로직만 스스로 구현하면 된다.
최종 결과물과 코드는 다음과 같다.
namespace WinFormsEx
{
    public partial class Calculator : Form
    {
        // 연산자
        enum Operators
        {
            None,
            Add,
            Subtract,
            Multiply,
            Divide,
            Reset
        }

        Operators currentOperator = Operators.None;
        Boolean operatorChangeFlag = false;
        double firstOperand = 0;
        double secondOperand = 0;

        public Calculator()
        {
            InitializeComponent();
        }
        private void AddNumberToDisplay(string number)
        {
            if (operatorChangeFlag)
            {
                label1.Text = "";
                operatorChangeFlag = false;
            }

            label1.Text += number;
        }
        private void tableLayoutPanel1_Paint(object sender, PaintEventArgs e)
        {

        }

        private void button1_Click(object sender, EventArgs e)
        {
            AddNumberToDisplay("1");
        }

        private void button2_Click(object sender, EventArgs e)
        {
            AddNumberToDisplay("2");
        }

        private void button3_Click(object sender, EventArgs e)
        {
            AddNumberToDisplay("3");
        }

        private void button4_Click(object sender, EventArgs e)
        {
            AddNumberToDisplay("4");
        }

        private void button5_Click(object sender, EventArgs e)
        {
            AddNumberToDisplay("5");
        }

        private void button6_Click(object sender, EventArgs e)
        {
            AddNumberToDisplay("6");
        }

        private void button7_Click(object sender, EventArgs e)
        {
            AddNumberToDisplay("7");
        }

        private void button8_Click(object sender, EventArgs e)
        {
            AddNumberToDisplay("8");
        }

        private void button9_Click(object sender, EventArgs e)
        {
            AddNumberToDisplay("9");
        }

        private void label1_Click(object sender, EventArgs e)
        {

        }

        private void button17_Click(object sender, EventArgs e)
        {
            try
            {
                secondOperand = double.Parse(label1.Text);
                double result = 0;

                // 연산자에 따라 계산
                if (currentOperator == Operators.Add)
                {
                    result = firstOperand + secondOperand;
                }
                else if (currentOperator == Operators.Subtract)
                {
                    result = firstOperand - secondOperand;
                }
                else if (currentOperator == Operators.Multiply)
                {
                    result = firstOperand * secondOperand;
                }
                else if (currentOperator == Operators.Divide)
                {
                    if (secondOperand == 0)
                    {
                        label1.Text = "0으로 나눌 수 없습니다.";
                        return;
                    }
                    result = firstOperand / secondOperand;
                }

                label1.Text = result.ToString();
                firstOperand = result; // 다음 연산을 위해 결과 저장
            }
            catch
            {
                label1.Text = "오류";
            }
        }

        private void button15_Click(object sender, EventArgs e)
        {
            AddNumberToDisplay("0");
        }

        private void button14_Click(object sender, EventArgs e)
        {
            if (operatorChangeFlag)
            {
                label1.Text = "";
                operatorChangeFlag = false;
            }

            // 이미 소수점이 있으면 추가하지 않음
            if (!label1.Text.Contains("."))
            {
                label1.Text += ".";
            }
        }

        private void button13_Click(object sender, EventArgs e)
        {
            firstOperand = 0;
            secondOperand = 0;
            currentOperator = Operators.None;
            label1.Text = "";
        }

        private void button11_Click(object sender, EventArgs e)
        {
            firstOperand = double.Parse(label1.Text);
            currentOperator = Operators.Divide;
            operatorChangeFlag = true;
        }

        private void button16_Click(object sender, EventArgs e)
        {
            firstOperand = double.Parse(label1.Text);
            currentOperator = Operators.Add;
            operatorChangeFlag = true;
        }

        private void button10_Click(object sender, EventArgs e)
        {
            firstOperand = double.Parse(label1.Text);
            currentOperator = Operators.Subtract;
            operatorChangeFlag = true;
        }

        private void button12_Click(object sender, EventArgs e)
        {
            firstOperand = double.Parse(label1.Text);
            currentOperator = Operators.Multiply;
            operatorChangeFlag = true;
        }
    }
}
최종적으로는 다음과 같이 프로그램이 작동한다.
전체 코드는 다음 경로에 있습니다.
Workspace/C#/WinFormsEx at main · cyphen156/Workspace (github.com)
'프로그래밍 > C#' 카테고리의 다른 글
| C# 반복자 패턴 IEnumerator과 yield키워드 (0) | 2025.02.25 |
|---|---|
| C# 버전별 핵심 기능 (1.0 ~ 7.0) (0) | 2023.12.01 |
| C#에서 클래스와 namespace(C++와 다른점 2) (0) | 2023.11.29 |
| C# 기초2 C/C++와 다른점 (2) | 2023.11.28 |
| C# 기초1 (0) | 2023.11.28 |


