

cyphen156
VS Code ChatGPT 4 Extension 만들기 #1 본문
공부하러 학교에 왔는데 공부는 하기 싫고 ChatGPT랑 놀다가 보니 엣지 브라우저 열고 GPT창 켜는게 귀찮아서 시작한 Visual Code Extension만들기 프로젝트
필요한 것은 OpenAI 계정과 CHAT GPT API Key, 그리고 VS Code와 Microsoft계정입니다.
1. Visual Studio Code - Code Editing. Redefined
Visual Studio Code - Code Editing. Redefined
Visual Studio Code is a code editor redefined and optimized for building and debugging modern web and cloud applications. Visual Studio Code is free and available on your favorite platform - Linux, macOS, and Windows.
code.visualstudio.com
여기 들어가셔서 프로그램 다운로드 한 뒤 설치하시고,
2. Overview - OpenAI API
OpenAI Platform
Explore developer resources, tutorials, API docs, and dynamic examples to get the most out of OpenAI's platform.
platform.openai.com
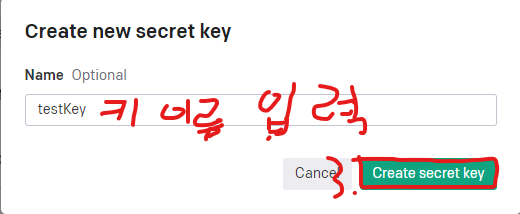
여기 들어가서 회원가입하고 GPT API키 요청하면 됩니다. 저는 승인받는데 대략 2주쯤 걸렷던거 같은데 요새는 바로 발급되는거 같아요.
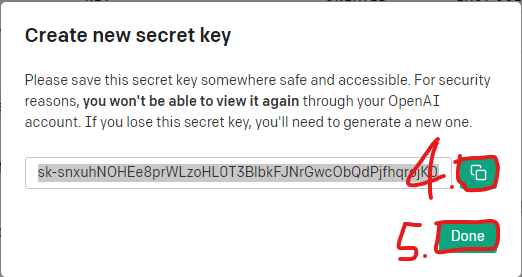
1번부터 5번까지 순서대로 따라하시면 됩니다.
4번은 카피버튼인데 나중에 잊어버리면 큰일나니까 꼭 눌러서 어디 메모장같은데 붙여넣어서 저장하시길 바랍니다.

3. Extension API | Visual Studio Code Extension API
VS Code 확장 api를 만들기 위한 문서입니다. 여기를 보고 열심히 만들면 됩니다.
4. Node.js (nodejs.org)
Node.js
Node.js® is a JavaScript runtime built on Chrome's V8 JavaScript engine.
nodejs.org
익스텐션을 만들고, 마켓플레이스에 배포하기 위해 사용할 Program Lang은 Javascript를 사용할겁니다.
저는 v19.3.0.를 사용하지만 그냥 LST사용하는걸 추천합니다.
https://cyphen156.tistory.com/60여기에 설치법을 설명해놨으니 참고하세요
5. Yeoman과 VS Code Extension Generator
이건 npm을 통해서 설치할겁니다.
터미널에 이 명령어를 입력하세요.
npm install -g yo generator-code다 설치되고 나면 터미널에 이 명령어를 입력하세요
그러면 이런 출력이 생길겁니다.
PS C:\Workspace\VSCODE_ext> yo code

     _-----_     ╭──────────────────────────╮
    |       |    │   Welcome to the Visual  │
    |--(o)--|    │   Studio Code Extension  │
   `---------´   │        generator!        │
    ( _´U`_ )    ╰──────────────────────────╯
    /___A___\   /
     |  ~  |
   __'.___.'__
 ´   `  |° ´ Y `

? What type of extension do you want to create? (Use arrow keys)
> New Extension (TypeScript)
  New Extension (JavaScript)
  New Color Theme
  New Language Support
  New Code Snippets
  New Keymap
  New Extension Pack
  New Language Pack (Localization)
  New Web Extension (TypeScript)
  New Notebook Renderer (TypeScript)
여기서 우선 javascript 프로젝트를 생성해봅시다.
화살표 키를 눌러 New Extension (JavaScript)로 이동시킨 뒤 엔터를 누르세요
그러면 여러가지 설정들이 나올건데 이걸 이렇게 입력하면
? What type of extension do you want to create? New Extension (JavaScript)
? What's the name of your extension? test_ext
? What's the identifier of your extension? test-ext
? What's the description of your extension?
? Enable JavaScript type checking in 'jsconfig.json'? Yes
? Initialize a git repository? Yes
? Which package manager to use? npm
이런 결과가 출력될겁니다.
순서대로
- 사용할 언어
- 이름
- 식별자
- 설명
- 타입체크용 json파일 생성 유무
- 깃 레포지토리 만들기
- 사용할 패키지매니저 : npm, yarn, pnpm
각각 원하는 옵션을 설정해주세요.
Writing in C:\Workspace\VSCODE_ext\test-ext...
   create test-ext\.vscode\extensions.json
   create test-ext\.vscode\launch.json
   create test-ext\test\runTest.js
   create test-ext\test\suite\extension.test.js
   create test-ext\test\suite\index.js
   create test-ext\.vscodeignore
   create test-ext\.gitignore
   create test-ext\README.md
   create test-ext\CHANGELOG.md
   create test-ext\vsc-extension-quickstart.md
   create test-ext\jsconfig.json
   create test-ext\extension.js
   create test-ext\package.json
   create test-ext\.eslintrc.json

To start editing with Visual Studio Code, use the following commands:

To start editing with Visual Studio Code, use the following commands:

     code test-ext

Open vsc-extension-quickstart.md inside the new extension for further instructions
on how to modify, test and publish your extension.

For more information, also visit http://code.visualstudio.com and follow us @code.


? Do you want to open the new folder with Visual Studio Code? (Use arrow keys)
> Open with `code`
  Skip
요롷게 폴더가 생성되었으면 성공한겁니다.
이제 작업영역 설정을 할겁니다.
그러고나서 실행창에서 Run Extension, Extension Tests가 있는지 확인한 뒤 루트 프로젝트를 연 뒤,
F5키를 눌러 디버깅을 시작하면 tsc -p옵션을 선택해서 클릭해 컴파일주세요 그러면 [학장 개발 호스트] 시작 이라는 새 비주얼 코드 창이 열릴겁니다.

새 창이 열리면 ctrl + shift + p를 눌러 hello world를 실행시켜보세요 그럼 오른쪽 하단에 extension이 활성화 되고 스크립트가 실행될것입니다. 원래 맨 처음에는 Hello World! {프로젝트 명}으로 출력됩니다.
만약 출력문을 바꾸고 싶다면 프로젝트 실행을 중단한 뒤
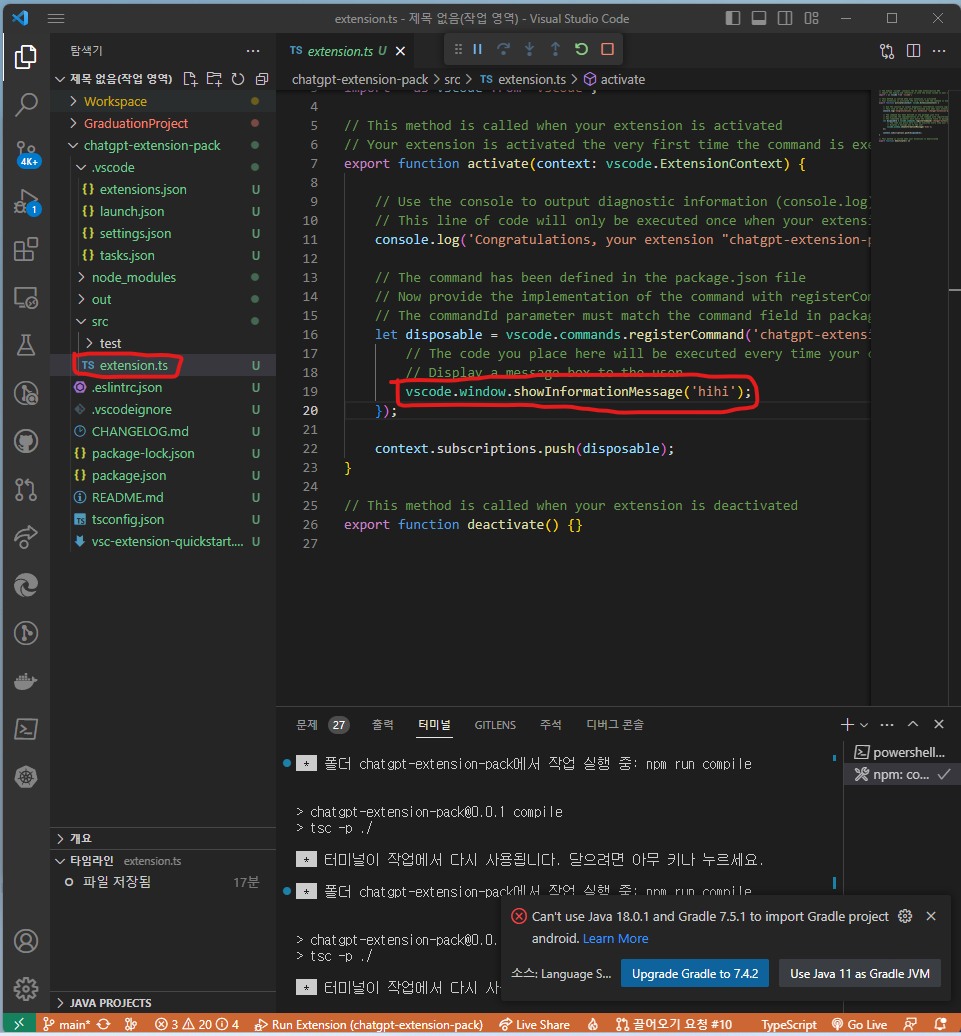
src폴더 내부의 extension.ts 파일에서 vscode.window.showInformationMessage();함수를 수정해주면 됩니다.
그리고 변경사항을 적용하기 위해 프로젝트를 다시 컴파일 해주세요.
++ ctrl + shift + p를 누른 뒤 Reload 명령을 실행시키면 자동으로 다시 컴파일한답니다. 이거씁시다
잘 모르시겠으면 여기들어가서 보고 따라하세요
첫 번째 확장 | Visual Studio Code 확장 API
Your First Extension
Create your first Visual Studio Code extension (plug-in) with a simple Hello World example.
code.visualstudio.com
자 이제 확장팩을 만들기 위한 기본 설정이 끝났습니다. 다음번에는 실제로 확장개발에 필요한것들을 찾아서 스크립트를 수정할 겁니다.
※ 프로젝트 생성을 타입스크립트를 공부할 겸 자바스크립트 -> 타입스크립트, 패키지 매니저를 npm -> yarn으로 바꾸었습니다.
'프로젝트 > Extensions' 카테고리의 다른 글
| VS Code ChatGPT 4 Extension 만들기 ##1 확장 기능에 대한 고민 (0) | 2023.06.30 |
|---|---|
| VS Code ChatGPT 4 Extension 만들기 #2 웹뷰 (0) | 2023.06.29 |

