| 일 | 월 | 화 | 수 | 목 | 금 | 토 |
|---|---|---|---|---|---|---|
| 1 | 2 | 3 | 4 | 5 | 6 | 7 |
| 8 | 9 | 10 | 11 | 12 | 13 | 14 |
| 15 | 16 | 17 | 18 | 19 | 20 | 21 |
| 22 | 23 | 24 | 25 | 26 | 27 | 28 |
Tags
- 메타버스
- 백준
- unity6
- 김진홍 옮김
- 이득우의 게임수학
- 전공자를 위한 C언어 프로그래밍
- C++
- 박기현
- C#
- 입출력과 사칙연산
- 일기
- 생능출판
- JavaScript
- Shimon Schocken
- 잡생각 정리글
- 이득우
- Noam Nisan
- 게임 수학
- HANBIT Academy
- 알고리즘
- booksr.co.kr
- (주)책만
- BOJ
- 주우석
- hanbit.co.kr
- The Elements of Computing Systems 2/E
- https://insightbook.co.kr/
- 데이터 통신과 컴퓨터 네트워크
- 밑바닥부터 만드는 컴퓨팅 시스템 2판
- C
Archives
- Today
- Total
cyphen156
AI Support :: Nav Mesh :: 유니티에서 제공하는 길찾기 본문
항상 모든 몬스터의 인공지능을 개발자가 코딩할 수는 없다.
그래서 유니티에서는 길찾기 알고리즘을 개발하는 시간을 단축할 AI Navigation이라는 레지스트리 패키지를 제공하고 있다.

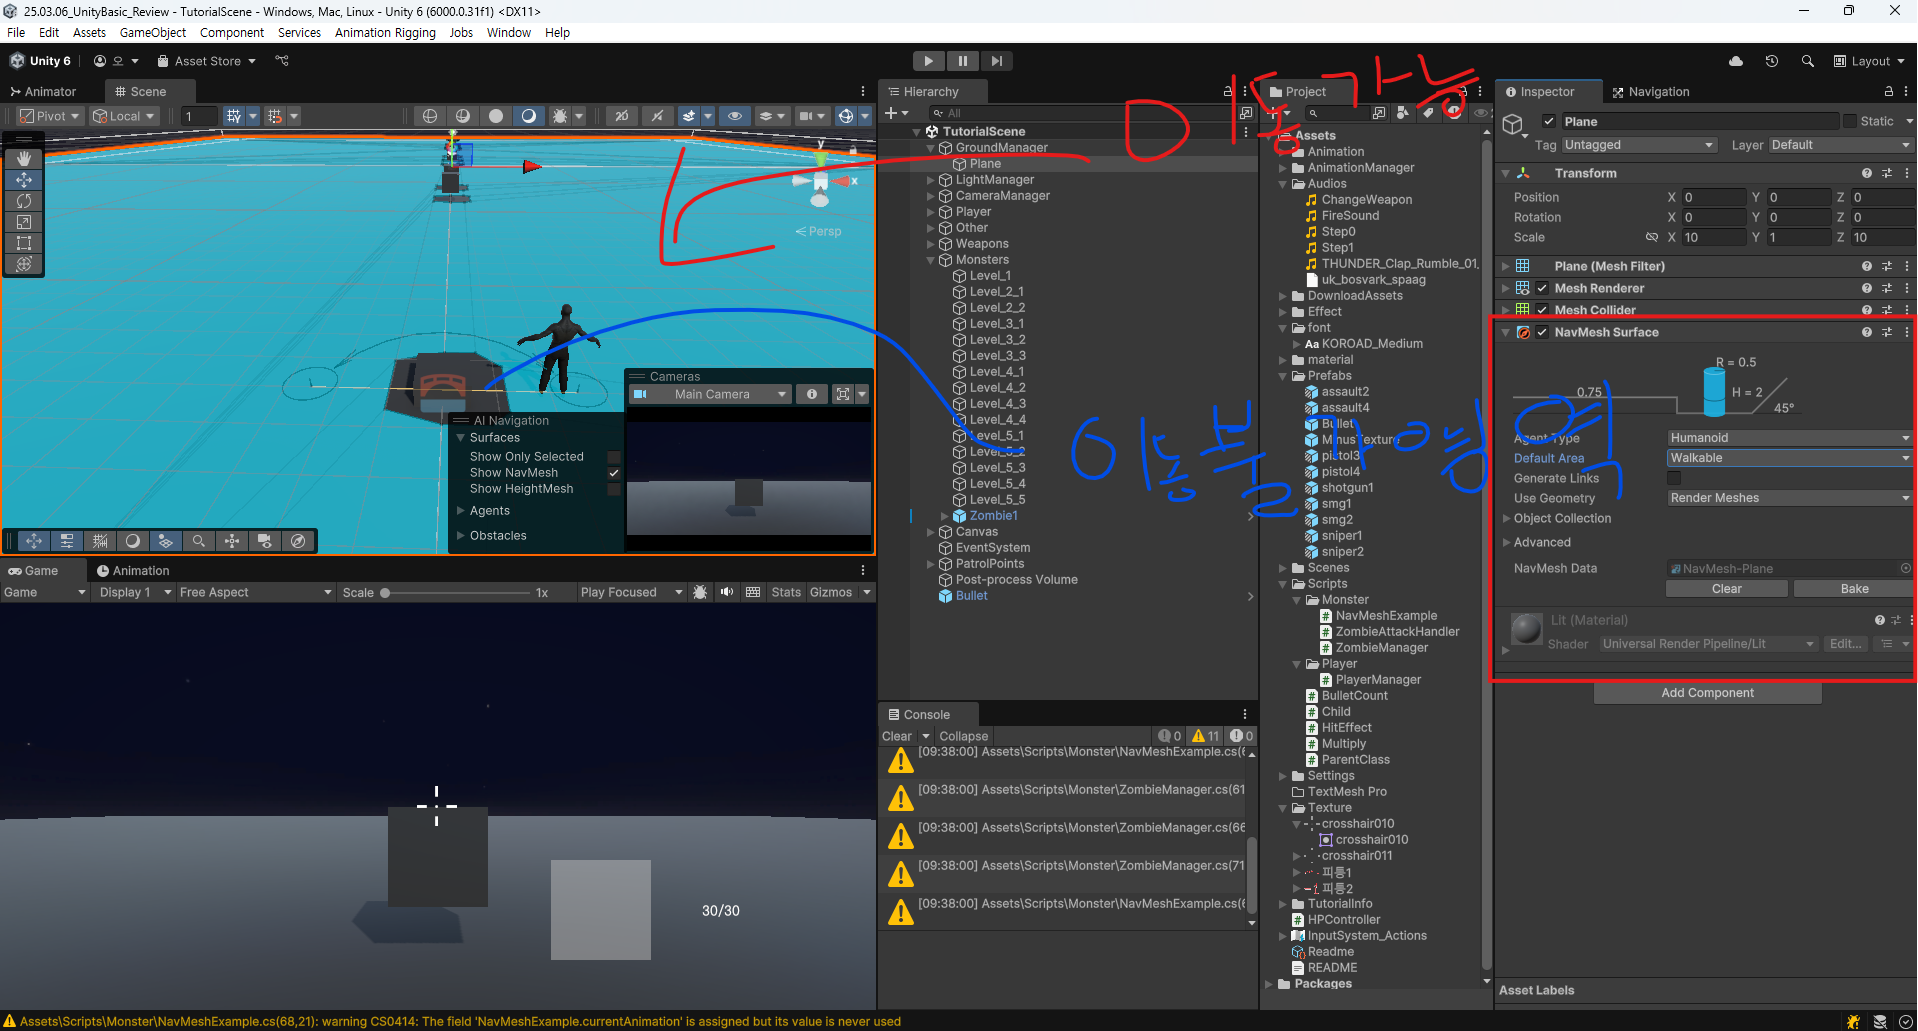
그리고 AI가 돌아다닐 수 있도록 Plain에 NavMesh Surface 컴포넌트를 달아준다.

여러가지 옵션들이 있지만 주의깊게 봐야 할 것은 Agent Type과 Default Area이다.
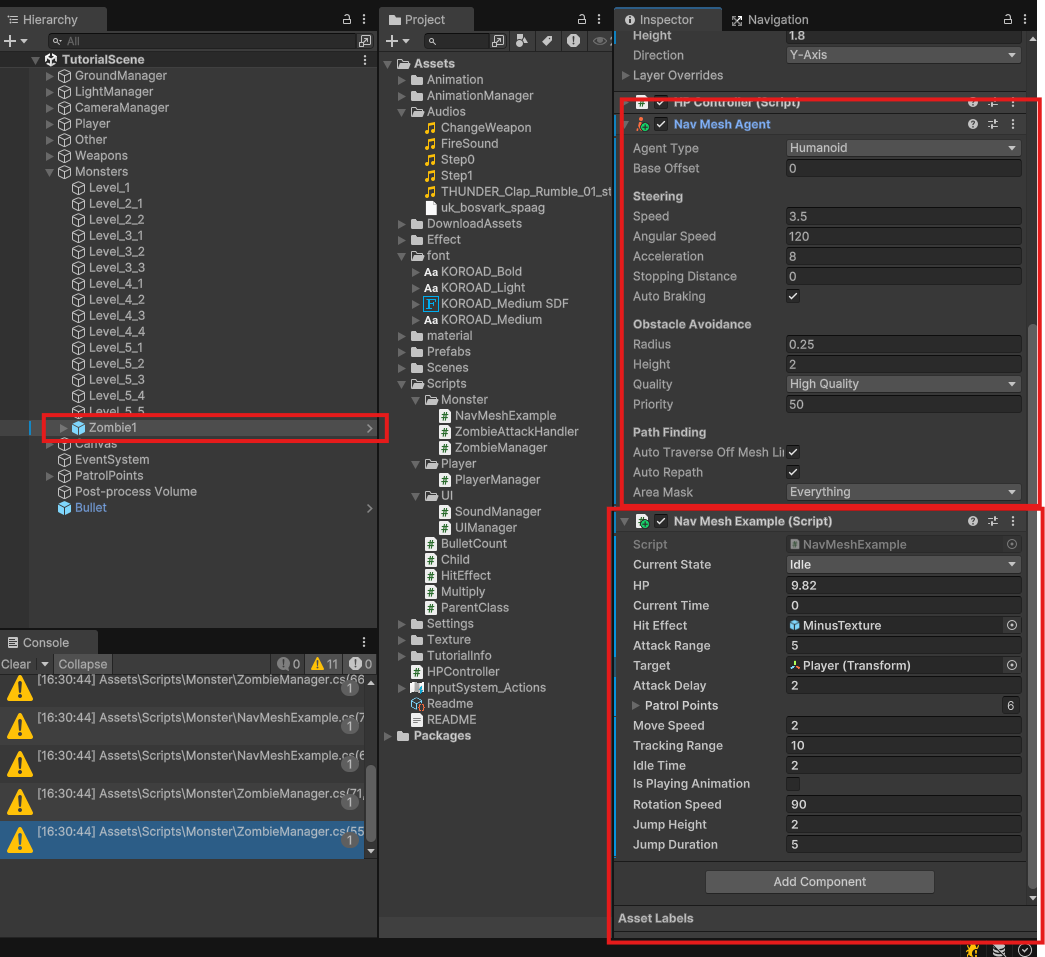
어떠한 형태의 오브젝트가 어느 부분을 활용하여 이동할지를 결정하는 것이기 때문에 항상 이것을 실제 AI오브젝트에 달린 컴포넌트와 맞춰 주어야 한다.
AI를 통해 제어할 오브젝트에 Nav Mesh Agent컴포넌트와 제어 스크립트를 부착해준다.
Using문
using UnityEngine.AI;
using Unity.AI.Navigation;
변수와 초기화
    private NavMeshAgent agent;

    agent = GetComponent<NavMeshAgent>();
플레이어를 추적하는 제어 함수
 void Chase(Transform target)
 {
     Debug.Log("추적");
     Vector3 direction = (target.position - transform.position).normalized;
     //transform.position += direction * moveSpeed * Time.deltaTime;
     agent.speed = moveSpeed;
     agent.isStopped = false;
     agent.destination = target.position;
 }
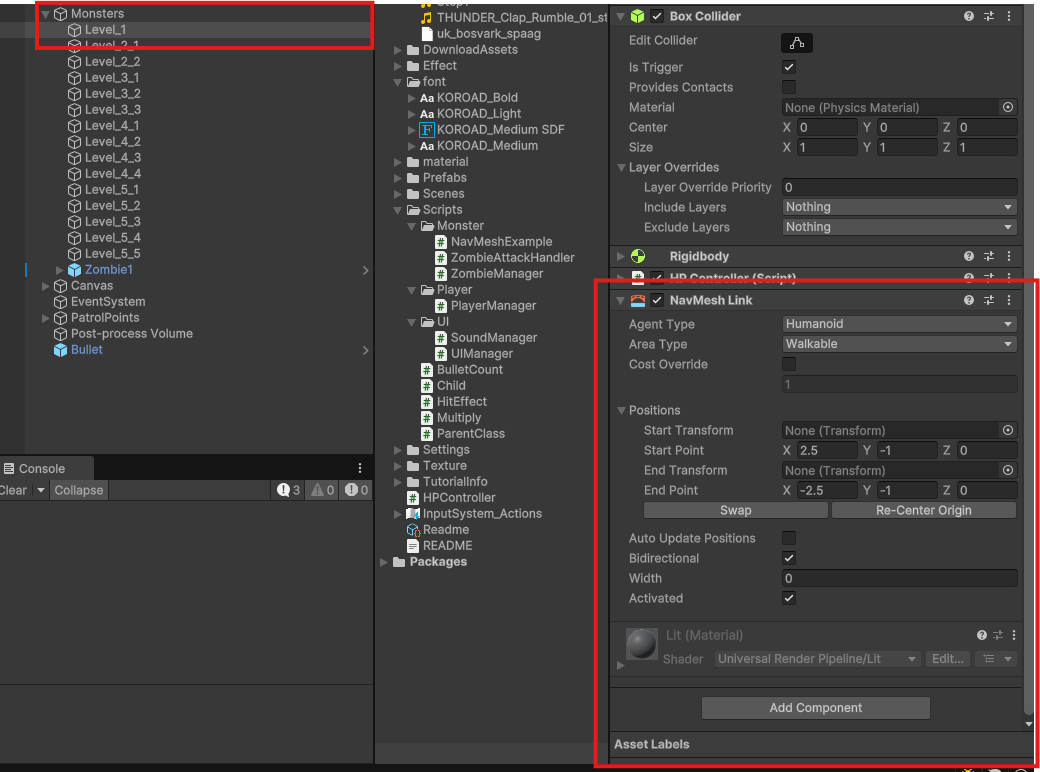
추가적으로 특정 경로를 강제하고 싶을때 사용하는 것이 NavMesh Link컴포넌트이다.
이 컴포넌트를 활용하면 NavMesh에서 제외된 구역을 마치 다리를 통해 건너듯이 경로를 이어주는 역할을 한다.


또한 NavMesh Link컴포넌트가 연결된 오브젝트와 상호작용 하기 위해 몬스터 컨트롤러에 코드를 추가해야 한다.
예를 들어 점프 한다는 코드를 추가하기 위해 다음과 같이 추가한다.
Using문
[RequireComponent(typeof(Rigidbody))]변수와 초기화
private bool isJumping = false;
private Rigidbody rb;
public float jumpHeight = 10.0f;
public float jumpDuration = 1.0f;
private NavMeshLink[] navMeshLinks;

    // void start()
    rb = GetComponent<Rigidbody>();
	navMeshLinks = FindObjectsOfType<NavMeshLink>();
플레이어를 추적하는 제어 함수
if (agent.isOnOffMeshLink)
{
    StartCoroutine(JumpAcrossLink());
}
점프 코루틴
private IEnumerator JumpAcrossLink()
{
    Debug.Log("점프 시작");
    isJumping = true;

    agent.isStopped = true;
    OffMeshLinkData linkData = agent.currentOffMeshLinkData;

    Vector3 startPos = linkData.startPos;
    Vector3 endPos = linkData.endPos;

    Debug.Log($"점프 위치: {startPos} -> {endPos}");

    float elapsedTime = 0f;

    while (elapsedTime < jumpDuration)
    {
        float t = elapsedTime / jumpDuration;
        float heightOffset = Mathf.Sin(t * Mathf.PI) * jumpHeight;
        Vector3 newPosition = Vector3.Lerp(startPos, endPos, t) + Vector3.up * heightOffset;

        transform.position = newPosition;

        Debug.Log($"Jump Progress: t={t}, Position={newPosition}");

        elapsedTime += Time.deltaTime;
        yield return null; // 프레임마다 실행
    }

    transform.position = endPos;

    Debug.Log("점프 완료");

    agent.CompleteOffMeshLink();
    agent.isStopped = false;
    isJumping = false;
}
최종적으로 다음과 같이 AI를 통해 몬스터의 행동을 제어할 수 있게된다.
'프로젝트 > 유니티' 카테고리의 다른 글
| 유니티 InputSystem ActionMap 할당 에러 해결 일지 (0) | 2025.10.14 |
|---|---|
| 유니티 핵심기능 - Addressable (1) | 2025.04.14 |
| 유니티 애니메이션 - 아바타 마스크 : 캐릭터 상하체 분리하기 (0) | 2025.03.12 |
| 유니티 애니메이션 중에 이벤트를 통해 특정 프레임에 함수 실행하기 (0) | 2025.03.12 |
| 유니티 2D 스프라이트 애니메이션 만들기 (0) | 2025.02.20 |


