
- 분류 전체보기 (484)

| 일 | 월 | 화 | 수 | 목 | 금 | 토 |
|---|---|---|---|---|---|---|
| 1 | 2 | 3 | 4 | 5 | 6 | 7 |
| 8 | 9 | 10 | 11 | 12 | 13 | 14 |
| 15 | 16 | 17 | 18 | 19 | 20 | 21 |
| 22 | 23 | 24 | 25 | 26 | 27 | 28 |
- 밑바닥부터 만드는 컴퓨팅 시스템 2판
- C#
- The Elements of Computing Systems 2/E
- C++
- 생능출판
- C
- unity6
- 잡생각 정리글
- Noam Nisan
- 김진홍 옮김
- 이득우의 게임수학
- booksr.co.kr
- 메타버스
- hanbit.co.kr
- (주)책만
- Shimon Schocken
- 데이터 통신과 컴퓨터 네트워크
- BOJ
- JavaScript
- 주우석
- 일기
- 알고리즘
- 이득우
- 박기현
- 전공자를 위한 C언어 프로그래밍
- 게임 수학
- 백준
- 입출력과 사칙연산
- HANBIT Academy
- https://insightbook.co.kr/
- Today
- Total
cyphen156
디스코드 봇 - 주크박스 만들기 #3 명령어 배포하기 본문
공부하긴 싫고 프로젝트도 조그맣게 하고싶어서 하는 프로젝트
이번 글은 공식 문서를 참고하여 작성됩니다.
Creating slash commands | discord.js Guide
discord.js Guide
Imagine a guide... that explores the many possibilities for your discord.js bot.
discordjs.guide
우선 프로젝트 루트 디렉토리에 하위 디렉토리로 commands/utility를 만들어 여기에 명령어 모듈들을 집어넣도록 하겠다.
일단 테스트용 Ping-pong 에코 서버 명령어를 제작한다.
우선 명령어용 디렉토리를 하나 만든다.
commands/utility
여기 안에 ping.js라는 명령어 모듈을 하나 집어넣고
ping.js
const { SlashCommandBuilder } = require('discord.js');

module.exports = {
	data: new SlashCommandBuilder()
		.setName('ping')
		.setDescription('Replies with Pong!'),
	async execute(interaction) {
		await interaction.reply('Pong!');
	},
};
그리고 user.js와 server.js를 통해 명령어를 입력/처리할 수 잇도록 모듈을 구성한다.
user.js
const { SlashCommandBuilder } = require('discord.js');

module.exports = {
	data: new SlashCommandBuilder()
		.setName('user')
		.setDescription('Provides information about the user.'),
	async execute(interaction) {
		// interaction.user is the object representing the User who ran the command
		// interaction.member is the GuildMember object, which represents the user in the specific guild
		await interaction.reply(`This command was run by ${interaction.user.username}, who joined on ${interaction.member.joinedAt}.`);
	},
};
server.js
const { SlashCommandBuilder } = require('discord.js');

module.exports = {
	data: new SlashCommandBuilder()
		.setName('server')
		.setDescription('Provides information about the server.'),
	async execute(interaction) {
		// interaction.guild is the object representing the Guild in which the command was run
		await interaction.reply(`This server is ${interaction.guild.name} and has ${interaction.guild.memberCount} members.`);
	},
};
그리고 Config.js에 ClientId와 guildId를 추가해준다.
다음과 같이 설정하면 아이디를 얻을 수 잇다.
Where can I find my User/Server/Message ID? – Discord
ClientID
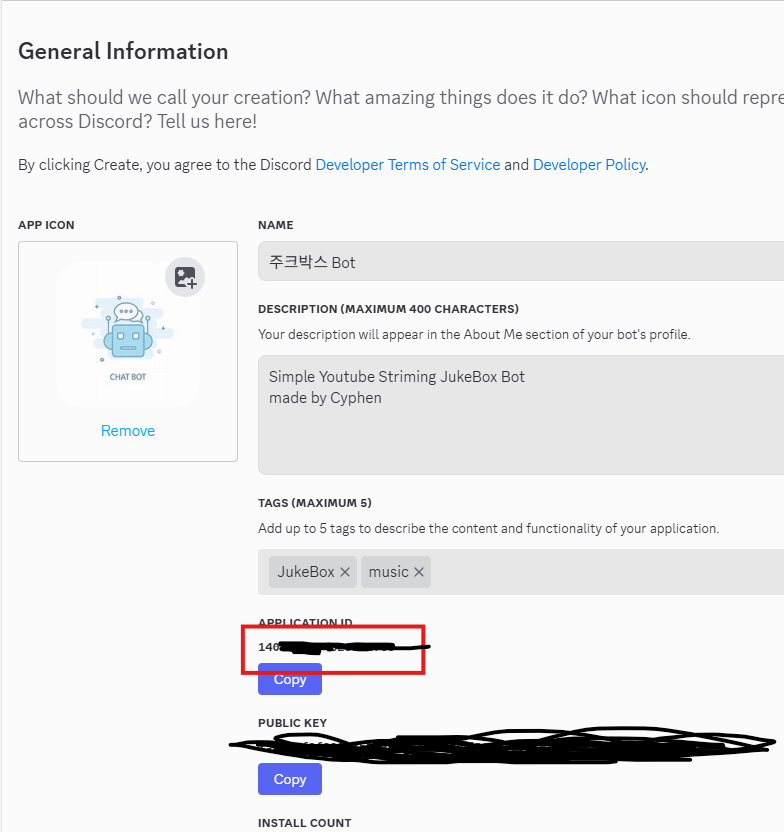
guildID
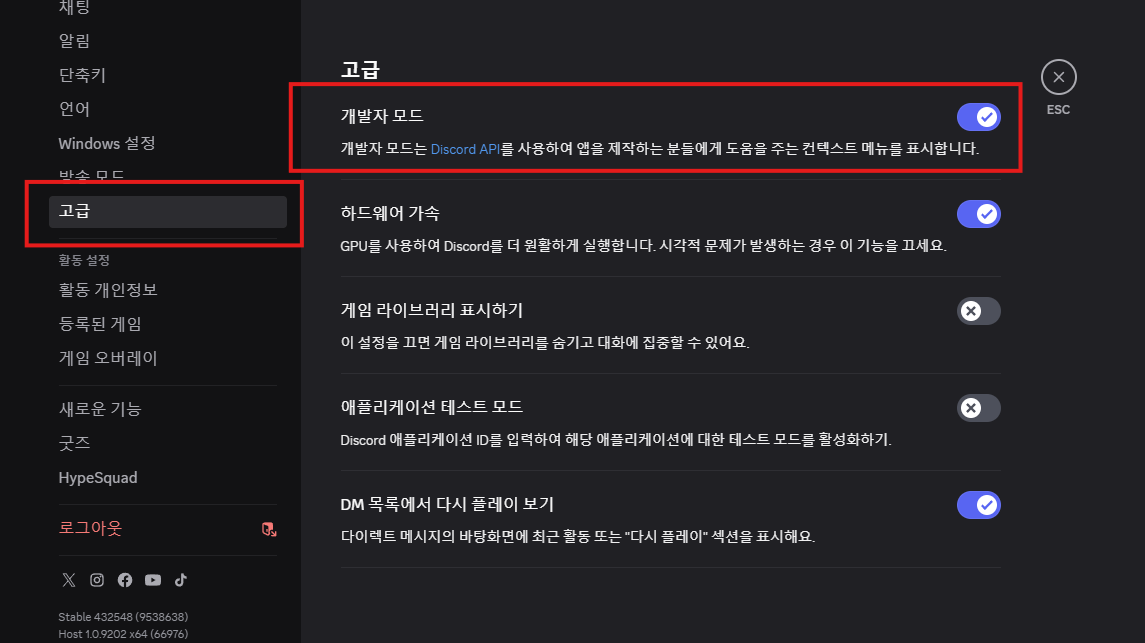
우선 디스코드 애플리케이션에서 개발자 모드를 활성화해준다.

Config.js
{
	"token": "MTQwNjkwN....",
	"clientId": "140....",
	"guildId": "124...."
}
그리고 나서 Index.js를 다음과 같이 수정해준다.
※ 저는 앱 진입점이 코드가 길어지는게 싫어서 bot.js로 이동시켯습니다.
Index.js
const bot = require("./bot.js");bot.js
const fs = require('node:fs');
const path = require('node:path');
const { Client, Collection, Events, GatewayIntentBits, MessageFlags } = require('discord.js');
const { token } = require("./config.json");

const client = new Client({ intents: [GatewayIntentBits.Guilds] });

client.commands = new Collection();

const foldersPath = path.join(__dirname, 'commands');
const commandFolders = fs.readdirSync(foldersPath);

for (const folder of commandFolders)
    {
	const commandsPath = path.join(foldersPath, folder);
	const commandFiles = fs.readdirSync(commandsPath).filter(file => file.endsWith('.js'));
	for (const file of commandFiles)
    {
		const filePath = path.join(commandsPath, file);
		const command = require(filePath);
		// Set a new item in the Collection with the key as the command name and the value as the exported module
		if ('data' in command && 'execute' in command)
        {
            client.commands.set(command.data.name, command);
		}
        else
        {
			console.log(`[WARNING] The command at ${filePath} is missing a required "data" or "execute" property.`);
		}
	}
}

// 이벤트 등록
client.once(Events.ClientReady, readyClient => {
  console.log(`✅ Ready! Logged in as ${readyClient.user.tag}`);
});

// 로그인 실행
client.login(token);

client.on(Events.InteractionCreate, async interaction => {
    if (!interaction.isChatInputCommand())
    {
        return;
    }
	const command = interaction.client.commands.get(interaction.commandName);

	if (!command)
    {
		console.error(`No command matching ${interaction.commandName} was found.`);
		return;
	}

	try
    {
		await command.execute(interaction);
	}
    catch (error)
     {
		console.error(error);
		if (interaction.replied || interaction.deferred)
        {
			await interaction.followUp({ content: 'There was an error while executing this command!', flags: MessageFlags.Ephemeral });
		}
        else
        {
			await interaction.reply({ content: 'There was an error while executing this command!', flags: MessageFlags.Ephemeral });
		}
	}
});

module.exports = client;
이러고나면 기본 명령어 제작은 끝났다.
이제 명령어를 배포하자.
프로젝트 루트 디렉토리에 deploy-commands.js 파일을 하나 만들고 코드를 삽입한다.
deploy-commands.js
const { REST, Routes } = require('discord.js');
const { clientId, guildId, token } = require('./config.json');
const fs = require('node:fs');
const path = require('node:path');

const commands = [];
// Grab all the command folders from the commands directory you created earlier
const foldersPath = path.join(__dirname, 'commands');
const commandFolders = fs.readdirSync(foldersPath);

for (const folder of commandFolders) {
	// Grab all the command files from the commands directory you created earlier
	const commandsPath = path.join(foldersPath, folder);
	const commandFiles = fs.readdirSync(commandsPath).filter(file => file.endsWith('.js'));
	// Grab the SlashCommandBuilder#toJSON() output of each command's data for deployment
	for (const file of commandFiles) {
		const filePath = path.join(commandsPath, file);
		const command = require(filePath);
		if ('data' in command && 'execute' in command) {
			commands.push(command.data.toJSON());
		} else {
			console.log(`[WARNING] The command at ${filePath} is missing a required "data" or "execute" property.`);
		}
	}
}

// Construct and prepare an instance of the REST module
const rest = new REST().setToken(token);

// and deploy your commands!
(async () => {
	try {
		console.log(`Started refreshing ${commands.length} application (/) commands.`);

		// The put method is used to fully refresh all commands in the guild with the current set
		const data = await rest.put(
			Routes.applicationGuildCommands(clientId, guildId),
			{ body: commands },
		);

		console.log(`Successfully reloaded ${data.length} application (/) commands.`);
	} catch (error) {
		// And of course, make sure you catch and log any errors!
		console.error(error);
	}
})();
터미널에서 deploy-commands.js를 실행시켜 실제로 애플리케이션에 명령어를 등록한다.
PS D:\project\jukeBox-bot> node deploy-commands.js/
Started refreshing 3 application (/) commands.
Successfully reloaded 3 application (/) commands.
그리고 봇을 실행시키고 명령어를 입력하면 다음과 같이 반응해준다.
PS D:\project\jukeBox-bot> node index.js
✅ Ready! Logged in as 주크박스 Bot#4534
이제 남은것은 youtube api를 가져와서 봇에게 권한을 주고 재생시키는 명령어를 삽입하는 것이다. 이건 내일해야지
프로젝트 코드는 다음 레포지토리를 통해 제공됩니다.
cyphen156/JukeBox-Bot: ToyProject : Discord JukeBox-Bot
GitHub - cyphen156/JukeBox-Bot: ToyProject : Discord JukeBox-Bot
ToyProject : Discord JukeBox-Bot. Contribute to cyphen156/JukeBox-Bot development by creating an account on GitHub.
github.com
'토이프로젝트 > 디스코드 주크박스 봇' 카테고리의 다른 글
| 디스코드 봇 - 주크박스 봇 만들기 #6 플레이리스트 저장 && 암호화 (3) | 2025.08.29 |
|---|---|
| 디스코드 봇 - 주크박스 봇 만들기 #5 복호화 → 암호화 재생 → 스트림 안정화 (6) | 2025.08.22 |
| 디스코드 봇 - 주크박스 만들기 #4 유튜브 연동하기 (3) | 2025.08.21 |
| 디스코드 봇 - 주크박스 만들기 #2 봇 활성화 및 코드 적용하기 (8) | 2025.08.18 |
| 디스코드 봇 - 주크박스 만들기 #1 봇 생성하기 (2) | 2025.08.18 |


